ProtoShape 2D
An extension for Unity3D that adds a simple way to create and edit 2D polygons, fill them with color, gradient or texture and generate colliders for them. Intended for quick prototyping of 2D games it can be used to create vector-styled terrain, decorations and whole scenes for the final game.
This trailer demos most important features of ProtoShape 2D:
Features
- Easy and intuitive way to create 2D objects by placing and dragging points right in Unity scene view.
- Color your scene without sprites. Fill polygons with solid color, two-color gradient or texture. Filling with solid color is optimized by using Unity's default strite material which minimizes draw calls.
- Generate matching polygon or edge 2D collider. There's an option to create 2D platforms quickly by adding edge collider only for the top part of the object.
- Simple keyboard controls: hold CTRL to delete points, hold SHIFT while dragging a point to snap it to other points or to the grid.
- Export objects you create to mesh assets or PNG files or use your own material on them.
- Supports sorting layers same way as sprites do.
- A fake anti-aliasing option that smooths the edges of polygons by adding a thin transparent gradient to them. Useful for mobile games where real anti-aliasing is costly.
How to use
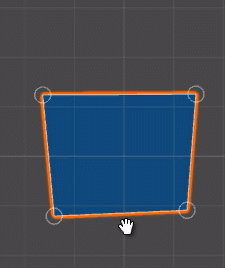
To start using it, just click Game Object > 2D Object > ProtoShape 2D in Unity's main menu. Or do the same by right-clicking the Hierarchy panel. This will add a polygon with four points to the center of your scene view.
To add new points to newly created polygon, simply click on its edges. To remove points, hold Ctrl and click on points you want to remove. Note that minimum number of points in polygon is 3, so you can't remove points if there's only 3 of them.
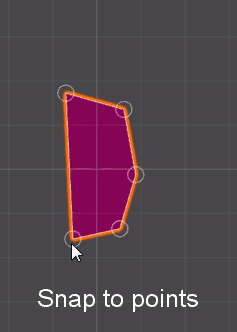
Hold Shift while dragging a point to use snapping. There are are three types of snapping you can use: snap to points, snap to world grid and snap to local grid.
When snapping to points, the point you're currently dragging will automaticallyy align to other points of the same polygon, horizontally, vertically or diagonally.
When snapping to world grid, the point will snap to a global grid. The size of the grid can be set in object's settings.
Snapping to local grid is similar to world grid with exception that the grid is centered to the object.
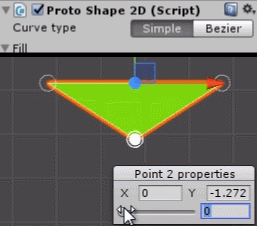
When you click on a point, you'll see its properties in the bottom right corner of your scene view. You can precisely set its relative coordinates and control its curvature. Note that in object's inspector there's a way to switch between simple and Bezier curves.
Simple is a quick way to round coners. The slider sets how far away the curve is pushed. It's a quick way to create curves but it lacks precision.
Bezier controls allow to manipulate the curve more precisely, as in vector graphics editors.
You can nest ProtoShape 2D game objects into one another to create more complex objects or just to group them.
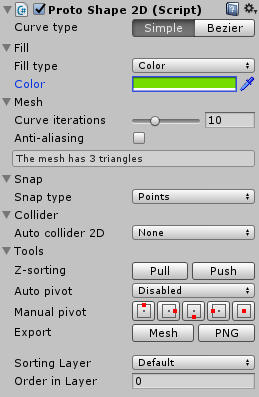
The shapes can be filled with color, gradient or texture. One thing to keep in mind about fill settings is that the most optimized solution is using a single-color fill - it uses Unity's default sprite material which minimizes the draw calls. Gradients and textures will create custom material per object so adding hundreds of such objects may become laggy on mobile devices.
Curve iterations setting controls how smooth are the curves of the polygon. In increases number of triabgles in the final mesh. It doesn't affect polygons with no curves.
Anti-aliasing option is an experimental feature that adds a transparent ridge to the polygon to make it look more smooth on mobile devices, where real anti-aliasing is costly.
Snap settings dfine which snapping model is used when you drag a point while holding down Shift button. There are three options: points, world grid and local grid. When one of the grid options is selcted, you'll be able to set the size of the grid.
Collider settings will automatically add a Rigid body 2D and a Polygon or Edge collider of the matching shape.
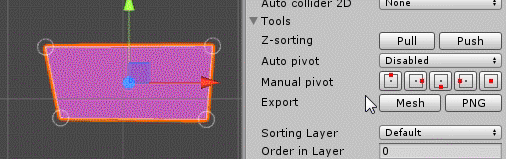
Z-sorting is just a simple way to to push and pull an object on z-axis.
Auto pivot and Manual pivot will allow you to control the position of object's pivot point.
Export buttons are for exporting your object as a separate mesh or a PNG image. Exporting to PNG will try to flatten all nested objects into one image. Right now it's sometimes produces colors that are a bit off, especially when working with transparency. If there's a fix for it, it will be added in next versions.
Sorting layer and Order in layer will work exactly the same as for sprites. ProtoShape 2D objects are intended to be used together with sprites.
If you have any questions, feel free to message me on Unity's Forums, on Twitter or by email.
If you like this asset, please consider giving it a rating or a short review on the Asset Store. This will help others to discover it and make sure I'll keep improving it.